Laminate Wood Floor
So you've chosen to do a Laminate Wood
Floor , also referred as a floating floor. Something you should know about this type
of hardwood flooring. It is very important, to allow them, to move around, otherwise
they will buckle and fall apart.
Any restriction, to a laminate wood floor will cause a problem. Having just the
expansion gap isn't enough. You must have a flat surface, to install this type of
hardwood flooring. This will avoid any popping or bounce in the floor. It can be pitched
downwards and still be exceptable as long as it's flat. If you can repair the subfloor,
do so.
 I don't recommend installing, laminate wood
floor, in a laundry area. The weight of the machine and the vibration caused from it,
will cause a separation problem, on click and lock style hardwood flooring. Instead,
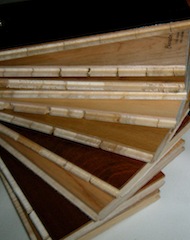
consider gluing the tongue and groove, type of laminate flooring, which is also known as
an engineered wood floor.
I don't recommend installing, laminate wood
floor, in a laundry area. The weight of the machine and the vibration caused from it,
will cause a separation problem, on click and lock style hardwood flooring. Instead,
consider gluing the tongue and groove, type of laminate flooring, which is also known as
an engineered wood floor.
Expect to either remove your baseboards or add shoe moldings. Factor this into your look
and feel of the room.
As long as you consider, these things. You'll be able to avoid problems with your
laminate flooring.
Let's get started.
Materials needed:
Laminate Flooring Round up to the nearest carton to cover waste. You don't want
to be short 1 piece.
Laminate Flooring underlayment Underlayment padding, helps hardwood flooring to
move, also, acts as a vapor barrier
6 mil clear plastic Vapor barrier, it is not needed, with some type of flooring.
Extra protection is always good. This is a small cost, that can prevent a lot of
problems.
Duct tape Seal those joints tight. Duct tape works best against, moisture
compared to other tapes.
Spacers Use spacers to determine your expansion gap. This can be purchased or
made out of square stock.The thickness should not be more than,1/16 less than, half the
thickness of your baseboards or shoe molding.
Keep in mind, the wood floor will shift and move. When it completely moves to one side
of the room, your expansion gap will be double the thickness of your spacers.
Flooring Tools needed:
Miter saw Use either a 12" miter saw, a slider type, if possible, or a jig-saw
with fine blade. You can also use a table saw, becareful of kickbacks.
Table saw
Knife
Level
Chalk line
Pencil
Masking tape
Flush cut saw You can also, use a multi-max type power tool.
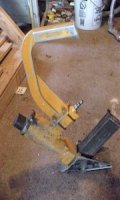
Flooring puller or flooring jack if obtainable. Can be purchased, for around
$100.00 at your flooring supplier. In some cases, you can use a prybar with a scrap
block.
Rubber mallet You can also use a regular hammer along with a tapping block, for a
substitute
Installation kit An installation kit will have a puller, spacers, and tapping
block. One stop shop. The puller is the most important tool, here. Be sure to get one,
made out of a quality material, it will bend.
Have you prepared your subfloor for your hardwood floor installation? If not,
refer back to the installation page.
Now,that the floors flat, clean and ready to go. Let's start our laminate wood floor installation.
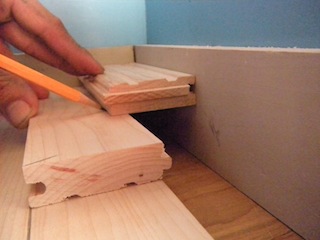
1. Undercut, any door trims and casing, associated with room, with flush cut saw, through to studs. To determine height, use laminate underlayment and flooring as height gauge. Remove baseboards, if you're not planning to install shoe moldings, then, clean work area.
2. Lay out the 6mil plastic, cover the whole entire floor. Allow, an extra 6"-8" per edge, extending up the walls, use masking tape, to hold in place. If, you use more than one piece, overlap the edges by a minimum of 4", then use duct tape, to seal the seams. Make sure it's tight.
3. Lay out the underlayment padding. Covering the entire flooring area. If, your padding did not come with a self-adhesive edge. Use duct tape to tape seams.
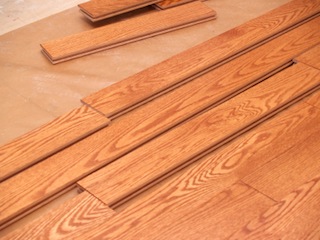
4. From your starting wall. This should be your longest wall, unless you're continuing from an existing laminate wood floor installation. Layout a full row of hardwood flooring. With groove side, length and width, facing wall. Preplan your cuts, so that , you won't end up with a very short piece on either end. Don't forget to compensate for your spacers, along the walls. Make your cuts, assemble the row together, make sure all joints are tight.
5. Slide the whole entire row up against your starting wall. Take the tape measure, check the row, to make sure it's parallel to the wall. Do this, by measuring from the corners of your starting wall to the front of the laminate wood flooring edge, adjust as needed. With a straight edge, verify that your row is straight, adjust as needed.
6. Visually or with a tape measure. Verify that your wall is straight, if not. This first row, should be scribed to the wall to compensate for irregularities. Use either a table saw or jig saw, to make your cut. Then reassemble row, place spacers along starting wall and groove end. Then push laminate wood flooring tight to spacers.
It's not necessary to place spacers on the cross cut side(opposite wall). All the pressure will always be pushed towards, only 2 walls, during the hardwood floor installation. Normally, the starting wall and groove edge along width.
7.Layout your next wood flooring row. Make sure the joints are staggered from the previous row. This distance should be a minimum of, 2x the width or more, if possible. Make your cuts, then assemble that row. Now push the whole row, up close to your first row. Lift the row up at a 45 degree angle, slide the groove onto the tongue. While firmly applying pressure, press down to lock. You can also use a tapping block and hammer, to assist you.
Most laminate wood floor or click and lock floors, are all manufactured one length. Staggered joints should be 1/2 the length if possible, or a minimum of 2x the width.)
If, a wedge gap occurs, along the joints.
Place a tapping block in front of this row, either the left or right side, and tap it to
tighten. A wedge gap indicates that the laminate wood floor is not straight. This is
common because of constant hitting and tapping. You just need to make adjustment by
re-tapping the front(tongue side).Note: You can install, your laminate wood flooring, one board at a time. I think this method is slow and much more work. It will require to constantly pull or tap the boards in place to ensure a tight fit. Please, keep in mind each time you tap and pull, this can cause previous pieces to move. I find it much easier, installing a complete row.
8. Repeat step 7. until your hardwood floor installation is complete. Make your necessary cuts and adjustment along the way. Scribe the final row (refer to the staple page to learn how to scribe), don't forget to compensate for your expansion gap, and use the puller or pry bar with a 18" - 24" floor board placed against wall, to prevent damage, to pull in place. If, the joints are not tight. Tap the floor board with rubber mallet or scrap block and hammer, to shake in place, while applying pressure, and your done.
Note: I suggested 18"-24", because most wall studs are spaced 16". This will prevent you from putting a hole in the wall.
9. Trim off, the extra plastic along the base of your walls, install your moldings , clean-up and move in!
Installing Over Humps
If, you forgot to fill in low spots in your subfloor, or just decided not to. Here's how you can get over the hump.before I begin, keep in mind that your floating floor can sepearate in the future. The hump will prevent it from performing properly (float around).
Here's how to get over the hump.
Examine your hump and determine the direction of your laminate wood floor, before installing your floor, to prevent having to take it apart and starting over.
Your flooring has 4 control points, each one of it's side is a control point (Length and Width).
To keep a straight line or a flatter surface, use less control points.
For a curvy line or uneven surface, use more control points.
Determine which direction of your hump has the shallow side, run your flooring length in this direction. You'll use less control points with longer boards.
Lay your flooring width over the steep side of your hump, narrow boards will equal to more control points or rows. This will help keep the laminate wood floor tight to your subfloor.
Generally you always want to lay your laminate flooring lengthwise, but if you have an uneven surface to work with.
The surface itself will dictate which direction your floor will be laid.
Now wasn't that easy. This is the easiest type of hardwood flooring to install. Anyone
can do it, with the tips and techniques on laminate flooring, that i've suggested. It
will take you less than a half day to lay 200 s.f.
Don't be afraid to try a different technique. If, it works for you, then continue with
it.
If, you need help or additional information about Laminate wood
floor, contact us.
Enjoy your new floor!
G and S woodfloors Lynn,Ma.