Why choose a hardwood floor installation
over other flooring options?
Why choose a hardwood floor installation over other flooring options? With so many flooring options to choose from. Selecting the right flooring for a busy modern day family with long-term value can be a daunting task. It's a big investment and the wrong choice can mean a lot of wasted money and time. Hardwood floors have more benefits compared to other flooring options, which makes it the best flooring choice and investment for your home.
In this article, I will explain to you the benefits of having hardwood flooring installed in your home compared to other flooring options like tiles, linoleum, carpet or luxury vinyl planks. How to choose flooring specie, cut, thickness, flooring type and installation type for the best performing floor and long-term investment for your busy modern day family.
Key benefits of hardwood floors

- Environmental benefits: Renewable and sustainable, trees are replanted to replace harvested one. Before it is harvested, trees grow for 40 years to reach maturity. Harvesting is done between 40 and 60 years of maturity. Which means every 20 years, we have raw material available. Hardwood floors last many generations, requires less raw materials and less waste in our landfills. Many can be recycled or reused as burning fuel for the mills.
- Health benefits: Do you or a family member have allergies? Hardwood floor installation improves indoor air quality. Allergens cannot live in or on the wood surface. The surface is sealed with finishes and anything on the surface is removed from daily cleaning. Which makes mold, animal fur and dust minimal. It makes breathing a lot easier.
- Durable and can be refinished: Hardwood floors are durable and can withstand your busy families lifestyle. And when it gets worn and tired looking. You can refinish it to bring back the new look. Or stain it, to give it a more updated look. No need to remove and replace like other flooring options.
- Competitive benefits: Wood floors in a house, adds more value and will sell faster, compared to other flooring options. It has more long-term value compared to other flooring options. Other flooring options require replacing when it has a dated look, making them a bad investment. A simple refinish and stain is all that's needed with wood floors. And a well maintained wood floor will last a 100 years or the life of the home. Other flooring options cannot simply compare to a hardwood floors.
Choosing the right wood specie
Choosing the right wood specie will depend on your personal preference, budget and lifestyle. There is more than 50 domestic and exotics to choose from. Here are three things to consider when choosing a wood specie for your hardwood floor installation.
- Make sure you are happy with your choice. Don't forget you are the one who is living with it. You do not want to live with regrets, due to the wrong selection. Take your time, visit websites and showrooms to find one that most appeals to you. Choose a light color for the open feel, medium for something warm and dark for a more statement.
- Not having the right budget is quite common when homeowners are picking out a hardwood flooring. A lot of time, not being able to afford the flooring they want and opting for something cheaper for the sake of having something new. Research and set aside the right amount of budget for the flooring you wan, ahead of time. Wood specie, flooring thickness, type and width will affect the cost of your hardwood floor installation.
- Choose a wood specie that will withstand your lifestyle. No one knows better than you, how busy your lifestyle is. You would not want to select a soft specie for a family of 6, two pets, heels, sports cleats, and large gatherings. Unless, it is the look you are after. Your wooden floors will look like a sculpted floor fast. Choose a wood specie durable enough for your lifestyle.
Site-finished or pre-finished?
This will depend on how much of a custom look you would like to achieve for your personal preference. They both have their benefits and advantages.
- Site-finished wood floors: If, you want a unique custom look, site-finished hardwood floor installation is the way to go. There are plenty of finishes and colorants available on the market for the most custom and unique look. Staining, aging, Ceruse and lime washing just to name a few wood finishing techniques. Polyurethanes, tung oils and hard wax oils are just a few top coats that can be used to help protect your wood floor investment. Be sure to hire an experienced finisher that has industry knowledge for the best finishing results. The down side with site-finished wooden floors is that you will need to keep off the floors during the finishing and drying process, so plan accordingly.
- Pre-finished wood floors: If, you cannot keep off your floors and need immediate use? Pre-finished hardwood floors is the best choice for you. These factory finished floors can be installed and used the same day. Making it ideal for time sensitive projects. The down side, customization is limited to what manufacturer's have to offer. And when they discontinue a product line, future repairs can become an issue.
Engineered or solid wood flooring?
Engineered or solid wood flooring? This will depend on where you live and which level of the home for the hardwood floor installation.
- Engineered wood flooring consist of a top layer of quality real wood veneer, a core and backing. The most common construction is real wood veneer, plywood core and backing the is oriented. There are others out there with a fiber core and veneer backing. Choose engineered flooring with a plywood core and backing for the best performance and moisture resistant. Engineered hardwood floors are available in 3/8", 1/2" and 3/4" thickness. Refinishing engineered flooring is limited to the thickness of the top veneer. Engineered flooring is more stable compared to solid wood flooring. There is less expanding and contracting, making it an ideal choice for installation on all levels of homes, especially in basements. If, your home is affected by high humidity swings and you do not want unsightly gaps. Choose engineered flooring for the best performing hardwood floor installation.
- Solid wood flooring are made of a solid piece of wood. Are available from 5/16" to 3/4" thickness. They can be installed on all levels of home except for basements. They expand more than engineered which makes it less stable. The benefit is that it can be sanded several times compared to engineered floors.
Plain sawn, rift & quarter sawn, quarter sawn or live sawn?
What is plain sawn, rift and quarter sawn, quarter sawn and live sawn? And why does it matter? Plain sawn, rift and quarter, quarter sawn and live sawn are all milling methods. These are methods that mills used to cut the flooring. Choosing the right cut will affect how your wooden flooring will perform in your home and the surrounding conditions.
 Source:NWFA.org
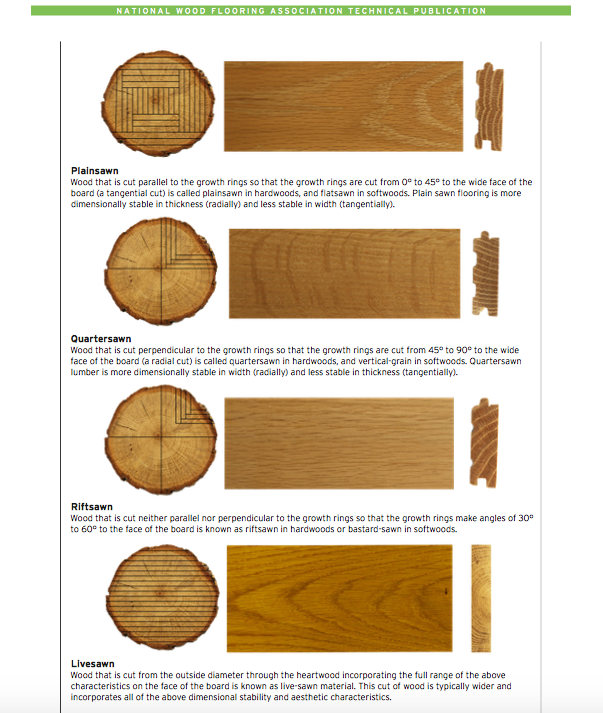
- Plain sawn is cut parallel to the growth ring of the tree, making it more stable in thickness and less stable in width. Plain sawn has visible early and late wood giving it a busy appearance. Most commonly used, not ideal for homes with high humidity swing, such as waterfront properties. All year climate control is highly recommended for this type of cut.
- Rift and Quarter sawn is cut at 30 to 60 degrees of the growth ring, making it stable along the width of the wood. It's appearance is usually long grains.
- Quarter sawn is cut perpendicular to the growth ring, making it more stable in the width and less on the thickness. The appearance is usually tiger stripes along the face of the flooring board. Ideal choice for homes that experience high humidity swings, such as water front properties.
- Live sawn is cut through the wood to incorporate all characteristic of the wood, ideal for the rustic look. It expands and contracts on all sides. Wide plank is more available than other cuts. All year climate control is highly recommended for this hardwood floor installation.
Strips, planks or parquet wood flooring?
Strips, planks or parquet wood flooring? Which one is best for you? Wood flooring is manufactured in three styles: strips, planks and parquets. Which one is best for you comes down to the one you prefer most.
- Strip flooring are flooring widths that are less than 3". Strips are the most dimensionally stable along the width, will make the room appear larger and is the most commonly used for the traditional look. The most common hardwood floor installation method is a nail/staple down. The most stable flooring dimension and cut is 2 1/4" quarter sawn flooring.
- Plank flooring are flooring width that is 3" and wider. Choose planks for a more casual and modern look. Planks that are 5" wide and wider requires a nail assist installation. A full trowel of flooring adhesive is applied and then the flooring is assisted with nail fasteners as a hardwood floor installation technique. This method will eliminate lateral movement in the center of the planks, where nails cannot reach.
- Parquet flooring are geometric shapes, vary in sizes and is not linear. it can be simple in design or complex. The most common installation method is a glue down method. The most common design is a herringbone and chevron pattern.
Above source info: NWFA.org
Hardwood Floor Installation
Staple or Nail Down Method
Before doing any hardwood floor installation, be sure that your wooden sub-floor is within industries installation standards and RH relative humidity levels is at normal living conditions 30-50% RH and 60-80 degrees room temperature. For more information on industry standards visit NWFA.org. Your sub-floor should be sound and flat within 1/4" over 10' radius. Proper acclimating of the hardwood flooring needs to take place. Hardwood flooring should be in the installation area for a minimum of 72 hours. A moisture test should be made with a moisture meter. Measure the sub-floor in several areas and measure several floor boards. For 2 1/4" flooring moisture content should be within 4% variation. For all other board sizes, readings should be within 2%, especially planks 5" and wider. If not, correct any issues, before continuing to ensure you have an easy installation process and your hardwood floors will perform at it's best.
 Thermo Hygrometer Thermo Hygrometer |
 Pin type Moisture meter Pin type Moisture meter |
Here's a list of things you will need to perform this Hardwood floor installation - Staple Down Method.
Material list:
Wood Flooring - be sure to purchase extra for waste.Round-up to the nearest foot when measuring length and width. Ex: 12' 1/2" x 12' 1/4" should be 13'x13'. This is enough to cover your waste (@ 2%), without having to over purchase. You must manage your cuts. I'll explain later.
Vapor Retarder - Manufacturer's recommended vapor retarder type. This should be stapled down, using T50 staples, with the edges overlapped by 4-6".
Wood Putty - use a latex color match wood filler, for nail holes.
Staple - You'll need 2" flooring staple, 1000 staples will cover 1000 square feet. Blind nail spacings at 6-8" apart
Finish Nails - 2" finish nails, face nailing spaces at 10-12" apart
Hardwood floor installation tool list:
Always follow NWFA standards and manufacturer's instruction, to avoid warranty discrepancies for hardwood flooring installation.
Determine which direction you would like to lay the hardwood flooring. You should always consider installing hardwood flooring, perpendicular to your floor joist, when you have a plywood sub-floor. This will eliminate any bounce and chattering, when you sand them.
If, you have a plank board style sub-floor, install hardwood floors perpendicular to the planks. This will eliminate any waviness on the hardwood flooring surface, giving you a much sturdier, stiffer and flatter floor. It will also make it easier to sand and finish them, if you're putting in site-finished wood floors.
Remove or under cut baseboards to allow proper expansion gaps. Rule of thumb, expansion gap equals thickness of your floor boards. 3/4" thick flooring equals 3/4" expansion gap. If, you have climate control and can maintain indoor humidity. You can do a tight-fit installation, as long as the hardwood flooring has been acclimated and conditioned properly.
 Laying the HWD-15 vapor retarder Laying the HWD-15 vapor retarder |
 Layout your bundles for easy reach and less down time Layout your bundles for easy reach and less down time |
1. Start by laying out the vapor barrier. Overlap the edges by 4-6" or more. Then staple the edges down, using the T50 stapler.
2. Establish a starting point. If you have existing wood floors, you should always continue off, where the floor has ended, run the flooring the same direction. Otherwise, lay them perpendicular to your floor joist and start from the longest wall, then follow these steps.
3. (2) points make a straight line. Measure off each corner of your starting wall -2x width of floor board plus expansion gap. Snap a starting or reference line using a chalk line.
4. From your starting wall, layout your bundles, 4ft from your chalk line, then 2ft apart. Making sure the Tongue side (considered the front edge) is facing away from the your chalk line.
5. Open a couple of bundles. Take your 6' level, preferred. Search for the straightest and longest pieces, for your starting row. Qualify the boards, by placing the level up against the groove side, with the top(flat) surface facing upwards and stress reliefs down.
 Selecting straight boards Selecting straight boards |
 Nailing the first straight row Nailing the first straight row |
Use the longest boards, if possible, this way you're be able to maintain a straighter starting row. This is ery important for any hardwood floor installation.
Note: Do not squeeze or press the floor boards, tight, against the level. You must check or inspect, the hardwood flooring, in it's free state, by just allowing the boards to touch the level, with no force or pressure - another important hardwood floor installation step. Do not use any floor boards, that are not straight, for your starting row. If need to, open additional bundles, until you have enough to start 1 complete row. Before inspecting or qualifying boards, both level and flooring should be free of dirt, splinters or debris.
6. Align, the groove side, of your starting row, with your chalk line. Mix your lengths as you line them up. Use a short, then long flooring board, pattern to ensure you get a more random look for your hardwood installation. Avoid "H" patterns and "step" joints. These joints are not appealing and can cause you're wood floors not to perform properly. Using the finish nailer, face nail the boards, nailing spaces should be 10-12" apart. Checking to make sure, the floor boards did not move and your starting row is straight.
If, you did not remove your baseboard, the first piece should be placed tight against the baseboard. Otherwise, if you did remove the baseboards, allow the proper expansion gap. Wall boards can be cut and removed to achieve additional gap space.
Note: If, you have climate control in your home all year around. There is no need to remove the baseboards. It's unlikely that your wood flooring will expand, because you'll have dry air all year round, from air conditioners and heaters. You only need to use expansion gaps if, you don't have any ways of controlling the climate inside. This normally applies to waterfront homes, where air conditioners are sometimes not used and moist air is allowed inside the home. Otherwise, always allow expansion gaps.
 Marking and cutting the final floor board
7. Cut in your final board of this row. If you have removed your baseboard, see image on right, without baseboard for reference.
Hardwood floor installation tip: You can measure your boards by simply, placing your floor board, groove end, tight against your wall. Then making a mark at where your, tongue side meets with your cut board, see image. Any waste or scrap ends 6" or longer, should be used as a starter piece in a new row.
By marking, at the end of the tongue, this will compensate for expansion space on this side of the wall, when you make your cut. Keep accuracy of your cuts within +/- one blade width.
Cutting end pieces with baseboards in place, the tolerance for accuracy of cut should be with a 1/64 or better. 8. Although industry standards allow 1/16" for maximum acceptable gaps. Now, that we have our starting row, nailed down. We want to rack or set-up, all of the floor boards, in the main body area or field, up to the end cut boards.
 Floor set up or racking
The cuts are the final boards in each row, that, requires cutting to proper size.
Hardwood floor installation racking or Set-up pattern. Start by laying out your boards, making sure the end joints are staggered. The end joint spacing should be a minimum of 6 inches for a staggered joint. The further the end joints, the better looking the staggered is.
Avoid repeating this pattern in consecutive rows and adjacent(rows) to each other, to prevent a cluttered joint look or a stepping pattern. Stepping patterns are weak joints. If, your floor buckles, you will see damages in these weak joints first. Also, avoid "H" patterns, which are also, unappealing.
To achieve a more random length pattern and professional hardwood floor installation look, use a short ,then long board layout to allow proper staggering of end joints, see image. Be sure that no more than 3 boards of the same size are laid out next to each other. Whether, in the same or adjacent row.
Repeat this step until you reach the opposite wall or until you're unable to lay out additional boards.
 installing over radiant heat
9. Take the rubber mallet, slide the first piece in place, with a foot on each end of the board, using light pressure(foot). Begin tapping the floor board tight to the starting row, from your left foot to right (careful don't hit your own foot). The face of your mallet should make contact with the tongue and not the top corner of your hardwood floor board, corners tend to break or dent resulting in more work.
Then with the hardwood flooring stapler, begin to fasten boards in place with staples, by striking the black bumper with the rubber mallet, stapling at the tongue, spacing the staples from 6 - 8" for a squeak free hardwood floor installation.
Repeat this step for each piece. Making sure the boards are tight together.
Note: It's very important, upon starting your hardwood floor installation. To becareful, not to use too much force, on the first 3 rows, when stapling the boards in place. Otherwise, you will turn your perfectly straight row into, a bunch of curves and turns. After, the 3rd row, when your hardwood floors are nailed firmly and is secure. You can use as much force as you need to, lookout for the toes and shins.
Repeat this for each row until you reach the opposite wall. Cut your end boards and install them, during your hardwood floor installation. Depending on your set-up, you can minimize a stop and go motion, by installing several rows in place, before making your cuts. This way you're able to make several cuts, during one stop at the saw, rather than 1 piece at each stop.
Note::You cannot minimize the amount of piece you must cut. But you can minimize the amount of time you travel, to and from the chop saw, to the work area. This is down time, the less down time, the faster you'll be able to complete your project.
Tip: To install hardwood floors close to the walls, Hold your mallet close to the rubber head and strike the bumper on the flooring stapler. Also, instead of swinging your mallet, drive straight down with it.
Hardwood floor installation
Nailing In Hardwood Floors Against The Wall
 floor jack floor jack |
 Quickly tighten and nail a floor with the use of a floor jack Quickly tighten and nail a floor with the use of a floor jack |
10. By this time, you've reached the opposite end of the room, and you're abut 16 - 18" or 4-5 rows away from the wall and cannot continue with stapling hardwood floors. To finish the remaining hardwood floor installation, switch over to the finish nailer. You'll also, need a hammer, flathead screwdriver, floor jack and pry bar.
If, you're able to get or rent a hardwood flooring jack. You can eliminate the flat screwdriver and pry bar with this one tool, it will be easier and quicker to complete this part of your hardwood floor installation.
11. Repeat step 8. for racking. For this hardwood floor installation step, you can install more than 1 piece at a time on this step, see images above. Move the first 3 pieces of the first 3 rows close to each other. Drive the tip of the flathead into the sub-floor, then begin to pull the hardwood floors towards you or place a 24" floor board up against the wall, then use a pry bar, to wedge the boards in. Or you can use a floor jack to pull the floor boards in place. This will pull the floor boards tight to each other. If, they do not fit tight, tap the faces of the boards to shake them in place, this will also set your hardwood flooring down tight to the sub-floor. Don't be afraid to use more force, but avoid denting the wood or damaging the wall
On pre-finished hardwood floor installation, use a scrap piece of material as a tapping block to avoid any damage.
After, the boards are tight to each other, while keeping pressure, face nail the floor boards, with the finish nailer. Repeat this hardwood floor installation step, until you reach the final row.
Scribing The Final Piece Against The Wall
 Scribing filler strips, for a tight fit
12. The final row - filler strips. At this point, you will need to scribe the final pieces in. Utilize only straight pieces at this point or the best ones you have left over, for tight fit hardwood floor installation. Start by placing one board over the final row, you have installed (left corner), see image on right. Align, the groove side to each other (lengthwise).
Using a scrap piece, as your scribe block. Turn it upside down, so that the stress relief or fluted side is facing upwards, and with the tongue tight against the wall (if the baseboards have been removed - by facing the scribe block as instructed, you will have also compensate, for an expansion gap).
Make a mark, where the 2 pieces meet, as you're sliding the scribe block, down the wall, careful not to move the piece that you're scribing. Cut this piece using a table saw, repeat this step where needed.
If, You are scribing with baseboards in place and need to make a tight fit. Simply face the groove side of your scribe block up against the wall, then make your mark.
When, you're making your cut, set your table saw, at around 15 degrees. This will produce a relief angle when you make your cut. So that you may be able to tap this piece in place, without interference or damaging your baseboards. After, you've completed your hardwood floor installation. Set your nails using a nail-set, then fill all nail holes and any unwanted gaps with a water based wood putty or wood filler.
Note: for site-finished floors. Allow the floors to sit and settle for at least 7 days before proceeding with the sand and finish phase.
It's a lot to take in, all at once. Take your time, you'll be just fine. This step by step hardwood floor installation guide will help you get the job done. You'll be a hardwood flooring pro.
Conclusion
Best Value - Hardwood floors offer the most benefits and most customization for flooring options compared to other flooring types. It's a durable, renewable, sustainable, long-term investment option. It's easy to see why so many homeowners choose hardwood floors over other flooring types.

Choose an ideal company
You have done all the research and now have the knowledge. Don't choose the wrong flooring company.
Why work with average, when you can work with an ideal hardwood flooring company? Avoid opting for sub-par products, poor workmanship, the lack of industry knowledge and training for the sake of something new.
With G & S Floors, you will experience optimum personal service, with superlative, effective premium quality workmanship in the industry and high quality products. Homes are one of the biggest and most important investments and should be cared by an ideal company.
We've been in business over 19 years. We are a NWFA flooring contractor and follow industry standards and best practice for hardwood flooring installation, sand and finishing. We have access to training and ongoing professional development. We have a well trained staff and we never stop learning. We have a powerful network of talented professionals, distributors, manufactures and experts.
Invest in "Quality" for better service and hardwood flooring that can last a lifetime or centuries!

Have questions, need solutions or service?
Gandswoodfloors professional development - About us

Anti Spam Policy - Copyright - Linking - Privacy - Terms - Website Disclaimer
Copyright 2011-2019. All rights reserved gandswoodfloors.com
Contact:
G & S Floor Service - Sye Phommachanh
Lynn,Ma. 01904 - Phone: (781)-632-1018