Thank You
If the redirect does not work, please click the following link:
Refinishing hardwood floors
Body section
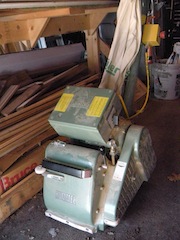
How To Use A Drum Sander
On this refinishing hardwood floors guide, we're going to start with sanding the body of the wood floor, using a drum sander. Load your drum or belt wood floor sander with a 60 grit sand paper.
Operating this machine is very simple. The tricky part is managing your power cable, without running it over or tripping over it.
Do a roll cast to roll it out to the side, or a forward and then back cast to place it behind you.
Or have a helper control the wire while your operating the hardwood refinishing flooring tool, careful not to trip over it.
Before we start, picture an airplane landing and taking off.
One smoothly lands on it's wheels, as another takes off into the air.
Memorize this motion, this is the same motion, you'll use to raise and lower the drum, on the wood floor sander.
Put that drum down to hard, and you'll gouge the floor, Raise it to fast, and you'll have unevenness.
Let's avoid unwanted gouges in our floor. This way there will be less work of fixing little problems like this one.
Like anything, it takes practice, to get use to it. Practice a few passes on a sheet of plywood, to get use to controlling the flooring tool, before you begin.
Becareful, you can seriously injure yourself and others, if, you use this hardwood refinishing flooring tool, incorrectly
 Refinishing hardwood floors using a Drum or Belt floor sander.
Flooring Tool Renting Tip: For heavy or aggressive sanding, use a drum floor sander. You'll need horsepower to refinish old hardwood floors. Plus the sandpaper will less likely break on you.
For finesse sanding, stain wood finish, tung oil wood finish, and 1 coat systems. Use a belt floor sander, for sanding wood floors, you can get grits up to 150.
Start from one corner of the room.
I usually start closest to where my cable is and work away from it. You should just keep away from the cable, for safety reasons.
Let's pretend the cable is on the left side. Sand with the grain of the wood floor.
Power up the machine, slowly start moving forward at the same time lower the drum control handle.
Once you feel the drum, touch the flooring, slowly and gradually release the lever, and proceed forward, at a slow constant speed .
As you approach the wall begin to raise the lever.
Note: Avoid bumping into the wall, this will apply pressure to the front of the sander downwards, resulting in gouges.
Start to move backwards, lower the lever, then start to sand backwards.
As you return to your starting point raise the lever.
You can have someone assist you with the power cable, to prevent tripping over it.
Repeat this process until the boards are sanded even.
This sometimes takes a few passes, depending on the wood flooring tool being used, horsepower and features makes a difference here.
Are you getting the hang of things, yet? Let's continue.
Once the flooring are even and the old finish have been removed.
Move the floor sander over half the distance of the drum's width.
Overlapping your passes will ensure that you won't miss any spots and end up with any uneven sanding areas.
Repeat this process until you've completely sanded the woodflooring on this side of the room.
Check the flooring to make sure you've sanded all the wood flooring evenly to each other, have removed the existing wood floor finishes and any unwanted marks. Before continuing on with your hardwood floor refinishing, re-sand any spots as needed.
Once completed, continue on the opposite side of the room.
Move any wires and cables that maybe in your way, continue with your hardwood floor refinishing, until whole entire room is completed.
After, you've finished with your first grit, continue on to the next grit size up.
Repeat the wood floor sanding process, until you've reached your final grit of 100, before continuing onto the next step of this refinishing hardwood floors guide..
Tip: Set any nails and apply wood putty to any gaps, before you start your final grit.
After, you've completed the hardwood flooring refinishing, clean debris if necessary.
There's a trick from not having to do, all this work, I'll mention it later.
For now, you should just stick to the basic step by step procedure, to ensure you get the best results, at the end.
When, refinishing hardwood floors, sanding backwards can be difficult or awkward.
You should sand in a forward motion, only.
This will take longer to complete. But, you'll prevent any accident or injury, from occurring.
Refinishing hardwood floors takes practice and repetition to become good at it. Inspect your work to ensure that you're getting the result you want. Look for gouges, missed spots, cuts, or unevenness, correct them as needed, before moving on to the next step.
If, you're unsure, contact a Flooring Professional, to prevent injuring yourself and others. Better to be safe then sorry.
When using this refinishing hardwood floors guide, please operate all machines in a safe manner, to prevent accidents and injuries from occurring.
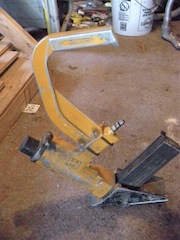
Now, we're ready to sand our edges, using edger refinishing hardwood floor.
Edger
Learn sanding tricks and tips on refinishing hardwood floors on certain types of wood flooring like:
Antique Flooring
Reclaimed Heart pine Flooring
White Pine Flooring
Maple Hardwood, Birch, and Beech Hardwood Flooring
Brazilian Cherry, Santos Mahogany, Teak, And Ipe Wood Flooring
White Oak and Red Oak Hardwood Flooring
Repairing Common Wood Floor Sanding Issues
G and S woodfloors Lynn,Massachusetts
Google+